

Building anything DIY can be as easy as playing with Lego bricks. All you need is the right tutorial or guide. Of course, this holds for a tiny home setup as well.
This beginner-friendly article will take you step-by-step through how to successfully set up and connect your Tumbleweed tiny house in just two hours.
So how do you get started?

Find a Good Location
Whether you are searching for your perfect spot, or already have the land selected, these pointers are must haves.
- Pick Good Ground: Choosing a spot that is relatively level and stable will be ideal for setting up your home, be it dirt or a cement pad. The more firm and level (or flat) the land, the better it will be when you start setting up your home.
- Consider Your Water Sources: Is there a nearby water source? In the city, it would be easy to get to the city’s water source. However, if you are setting up your tiny house off grid, you will need to look out for wells or boreholes—you might have to get creative when it comes to sourcing water. This is vital for your plumbing.
- Waste Water: Will you be connecting to a sewer, a septic system, or using a composting toilet and gray water? Your Tumbleweed will arrive with hookups for all 3. It’s important that you understand where your waste will be going … and if it’s going uphill, you’ll need to have a macerator and pump system installed before the house arrives.
- Electrical connection: This is invariably a necessity when it comes to living comfortably. You need electricity to light up your house, power your electrical appliances, and charge up your electronic devices. Tumbleweed Tiny Houses are wired for 50 amp service. Make sure you have an electrician setup the receptacle before the house arrives.

Parking Your Tiny Home
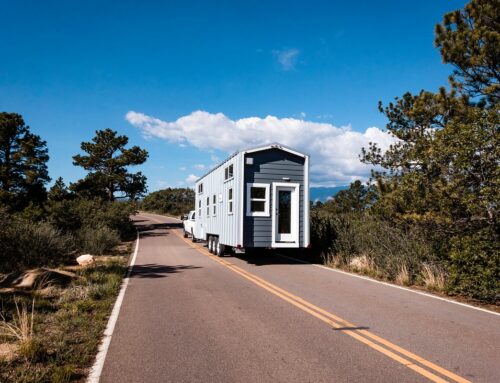
Once you have located the perfect spot, it is time to move on to the next step: parking your tiny home. Don’t gloss over this step because it sounds as easy as parking a car… a tiny house is much harder to move once set. This step is just as vital to your tiny home setup as any other.
- Make sure that your tiny house is positioned on the site so that you have access to all the connections that you need. Check for overhead clearance when positioning your trailer and cut back any branches that can scratch the roof.
- Check to see if the RV trailer is level from side to side using a level. If the location you’ve picked isn’t wholly level from side to side, you may place a solid wooden board behind the wheels on the low side of your tiny home RV and back the wheels up onto it. This simplifies the process of leveling your home and allows you to spend less time doing it.
- Wedge the four wheels of your RV using stones, woodblocks, or wheel chocks (you can find one in a retail store near you). Do this before detaching your home from the towing vehicle to prevent it from rolling away. These chocks won’t be moved any longer.
- Disconnect your tiny home trailer from the towing vehicle, including the safety chains and electrical cord, and place it neatly on the trailer tongue.
- Unlock the hitch ball coupler by removing the cotter pin. If you are unsure about the part that you should move each time, don’t worry. The official manual provides illustrations that help you locate these parts.
- Slowly drop the jack located at the tongue and use it to lift the trailer off the tow ball. Once you have done this, pull the towing vehicle out of the way.

It’s Time to Level Up
Now, it is time to level your tiny home. This process in your tiny home setup is very important because you don’t want your home to be tilted—it could be a hassle if not done right.
However, since you did your due diligence in the previous stage, this process is already half-done. This will be an easy step for you. To ensure that your trailer is perfectly leveled, Tumbleweed includes a free level ruler (see image) for your tiny house.

To use the level ruler properly:
- Make sure you only place the level ruler on clean surfaces.
- Place the level ruler on a surface parallel to the side you want to check (i.e., if you are leveling front-to-back, place the level perpendicular to the length of the tiny house).
- Allow the bubble to float and settle in the tube.
- Adjust your tiny house so the bubble is between the lines on the tube.
Now you must begin adjusting the trailer to ensure that it is perfectly leveled as indicated by your level. Your Tumbleweed comes with 5 jacks. There is one giant jack on the tongue of the trailer, and 4 smaller jacks at each corner of the tiny house.
- Use the trailer’s manual hitch crank to adjust the ton jack located at the tongue of your trailer. This way, you begin to level the trailer from front to rear. Work with your Tumbleweed level and ensure that the bubble is between the lines of the tube. If it is not, continue to adjust until it is.
- Next, check to ensure that the trailer is still balanced from side to side. If there is any imbalance, then use your corner jacks to lift the side that needs adjustment, adjusting it from side to side. Make use of wooden blocks to give it the desired height.
- Double check the front-to-back to make sure it’s still level. If it’s out of level, continue to adjust the jacks as needed. Before moving to the next step, make sure the tiny house is level going both front-to-back and side-to-side.
- Stabilize the trailer: Once your trailer is level, place a leveling block under each spot that has a stabilizer jack for sure footing. Now lower each jack until it makes firm contact with the blocks on the ground and you meet significant resistance.
- Note that the stabilizing jacks are not meant for support—they cannot carry the weight of the house. Rather, they are meant to prevent the trailer from rocking.
Remember to always leave the wheels of the trailer wedged with your chocks, and never pack on an inclined plane—the wheels should always be touching the ground.
Now, it is time to level your tiny home. This process in your tiny home setup is very important because you don’t want your home to be tilted—it could be a hassle if not done right.
However, since you did your due diligence in the previous stage, this process is already half-done. This will be an easy step for you. To ensure that your trailer is perfectly leveled, Tumbleweed includes a free level ruler (see image) for your tiny house.
To use the level ruler properly:
- Make sure you only place the level ruler on clean surfaces.
- Place the level ruler on a surface parallel to the side you want to check (i.e., if you are leveling front-to-back, place the level perpendicular to the length of the tiny house).
- Allow the bubble to float and settle in the tube.
- Adjust your tiny house so the bubble is between the lines on the tube.
Now you must begin adjusting the trailer to ensure that it is perfectly leveled as indicated by your level. Your Tumbleweed comes with 5 jacks. There is one giant jack on the tongue of the trailer, and 4 smaller jacks at each corner of the tiny house.
- Use the trailer’s manual hitch crank to adjust the ton jack located at the tongue of your trailer. This way, you begin to level the trailer from front to rear. Work with your Tumbleweed level and ensure that the bubble is between the lines of the tube. If it is not, continue to adjust until it is.
- Next, check to ensure that the trailer is still balanced from side to side. If there is any imbalance, then use your corner jacks to lift the side that needs adjustment, adjusting it from side to side. Make use of wooden blocks to give it the desired height.
- Double check the front-to-back to make sure it’s still level. If it’s out of level, continue to adjust the jacks as needed. Before moving to the next step, make sure the tiny house is level going both front-to-back and side-to-side.
- Stabilize the trailer: Once your trailer is level, place a leveling block under each spot that has a stabilizer jack for sure footing. Now lower each jack until it makes firm contact with the blocks on the ground and you meet significant resistance.
- Note that the stabilizing jacks are not meant for support—they cannot carry the weight of the house. Rather, they are meant to prevent the trailer from rocking.
Remember to always leave the wheels of the trailer wedged with your chocks, and never pack on an inclined plane—the wheels should always be touching the ground.

Powering Your Home
The rest of the process in your tiny home setup is as easy as it gets after you level the house. Tumbleweed supplies a FREE electrical cable with your house (you can also purchase a 50-amp cable for about $100). Now, all you have to do to draw power is:
- First, switch off the circuit breaker at the power supply source.
- Connect the included electrical cable to your tiny house’s exterior outlet.
- Then, connect the other end of that power cable to the outlet on the 50 A power supply.
- Lastly, flip on the breaker at the power supply source, and you’re done! Let there be light!

Tiny House Plumbing
Your tiny house plumbing, which is the next step, requires some effort. Tumbleweed has made it very easy and convenient for you to get water flowing through your home.
First, you want to connect the waste and sewage. To do this:
- Simply attach your waste hose to the 3-inch sewer outlet on the side of your Tumbleweed (if you have a compost toilet, connect a garden hose to the smaller receptacle on the same sewer outlet to flush away gray water—the water will not backwash into the pipe).
- Next, open the sewer valve via the exterior handle near the sewer outlet. And you are done!
To set up the water supply:
- Connect the supplied pressure regulator to the spigot on your water supply. When using municipal water from a pressurized line, you must use this water regulator to protect the plumbing in your house from too much water pressure.
- Connect a freshwater hose (rated to carry drinkable water) from that pressure regulator to the hose bib on the house’s exterior.
- Turn on the water source at your spigot.
- Each new Tumbleweed comes with antifreeze in the lines. You need to flush it out. Turn on each water fixture (both hot and cold) and make sure the water runs clear for at least 3 minutes. Then turn off your fixtures.
To activate your water heater:
- Open the valves marked Cold water in and hot water out. Close the valve marked Bypass.
- Next you want to clear out any air from the tank. Run hot water from the sink tap until all air is out of the tank. This could take a few minutes and the water will be cold.
- If it’s an electric water heater, allow the tank to fill up. Only then can you turn on the breaker for the water heater. Otherwise you will burn out the heating elements. Allow 20-30 Minutes for water to heat depending on the size of the tank.
If you have a propane water heater, skip the last step above and follow these steps:
- Turn on the propane for the tiny house.
- Some propane heaters also have a control panel for the water heater which needs to be turned on as well.
- Now that the propane is on, turn the hot water on and you should hear the water heater try to ignite. You may have to cycle the water heater several times to get the air out of the gas lines. Cycle the system by turning the hot water on, if it doesn’t ignite, turn water off for 1 minute, then try again.

Pictured is the water regulator that is included with your Tumbleweed Tiny House.
Conclusion
Follow this process and you will have your home set up in no time. Tumbleweed is so easy to get up and running. Since this is a beginner’s guide, the more you go camping or have to set up the RV, the easier and faster it gets.


Leave A Comment